Spooky Stitches: Creative Ideas for Halloween Embroidery Digitizing
The air is getting crisp, and there’s a whisper of magic in the breeze. It’s the perfect time to trade your summer florals for something with a little more bite. For embroidery enthusiasts, Halloween isn’t just about candy and costumes; it’s a fantastic opportunity to dive into Halloween Embroidery Digitizing and create one-of-a-kind, spine-tingling projects. Whether you’re personalizing trick-or-treat bags, decorating cozy fall blankets, or crafting unique gifts, mastering the art of spooky digitizing unlocks a world of creative possibilities.
This guide will spark your imagination with a cauldron full of design ideas and provide practical digitizing tips to ensure your Halloween projects are a scream (the good kind!).
Setting the Scene: Choosing Your Halloween Style
Before you start plotting stitch points, it helps to decide on the overall vibe you want to capture. Halloween aesthetics range from cute to creepy, and your digitizing choices will bring that feeling to life.
- Whimsical & Cute: Think smiling pumpkins, friendly ghosts, cute bats with big eyes, and cartoonish candy corn. This style is perfect for children’s items and projects that aim for charm over chills.
- Classic & Spooky: This is the realm of traditional jack-o’-lanterns with flickering grins, elegant black cats, silhouetted haunted houses, and full moons. It’s nostalgic, instantly recognizable, and offers a balanced mix of fun and fright.
- Elegant & Macabre: For a more sophisticated take, consider intricate filigree skulls, delicate spiderwebs, Art Nouveau-inspired witches, or ornate Gothic lettering. This style works beautifully on dark-colored tea towels, tote bags, and apparel for adults.
- Downright Horror: If you’re going for maximum impact, channel classic horror motifs. Think dripping blood text, zombie silhouettes, creepy clowns, or iconic movie villains. Use this style sparingly for dramatic effect.
A Cauldron of Creative Design Ideas
Now, let’s brew up some specific project ideas to get your creative juices flowing.
1. The Classic Jack-o’-Lantern: A Study in Stitch Types
A pumpkin is the perfect canvas to practice different digitizing techniques.
- The Base: Use a medium-density fill stitch for the main pumpkin body. Consider a slight gradient by using two shades of orange thread to add depth.
- The Face: This is where you can get creative. For the eyes, nose, and mouth, a satin stitch is your best friend. It creates a smooth, raised outline that really pops. For a more rustic, “carved” look, you could use a running stitch.
- Pro Tip: Don’t forget the stem! A short, dense satin stitch in a mossy green or brown adds a perfect finishing touch.
2. Spectral Silhouettes: Less is More
Some of the most effective Halloween designs are the simplest. Silhouettes are not only easy to digitize, they stitch out quickly and look incredibly sharp.
- Haunted House: A black silhouette of a classic Victorian house with a few gables and a crooked chimney against a dusky purple or orange sky.
- Flying Bats: A cluster of bats in flight creates a dynamic, spooky shape. Digitize these as a single fill-stitch object for a bold look.
- Leafless Trees: The gnarly, twisting branches of a barren tree against a full moon make for a beautifully eerie design.
3. Bewitching Text and Spooky Sayings
Personalize your projects with Halloween phrases. The font you choose and how you digitize it makes all the difference.
- Boo-tiful Fonts: A wispy, script font for “Boo,” a jagged, rough font for “Trick or Treat,” or a classic Gothic font for “Happy Halloween.”
- Digitizing Text: For most readable text, a satin stitch is ideal. If the text is large, you might use a fill stitch for the letters and a satin stitch border. Always increase the pull compensation for letters to prevent the fabric from showing through the stitches.
4. Elegant Spiderwebs: Mastering Underlay
A spiderweb is a test of digitizing skill and a stunning design when done correctly.
- Start with the Frame: Digitize the main structural threads of the web first using a running stitch or a thin satin stitch.
- Add the Spiral: The spiral thread is a continuous running stitch. The key is to ensure the stitches are not too long, or they will be loose and snag-prone.
- The Crucial Underlay: For the web to hold together on fabric, a light underlay is essential. A edge run or a light fill underlay will anchor the delicate running stitches to the fabric, giving the web stability and preventing it from puckering or pulling out.
5. A Ghostly Gradient: Playing with Thread
You can create stunning effects without complex editing by simply using creative thread choices.
- The Ombre Ghost: Digitize a simple ghost shape as a fill stitch. Instead of using plain white thread, stitch it with a variegated thread that shifts from white to a light grey. This instantly gives your ghost dimension and a mysterious, ethereal glow.
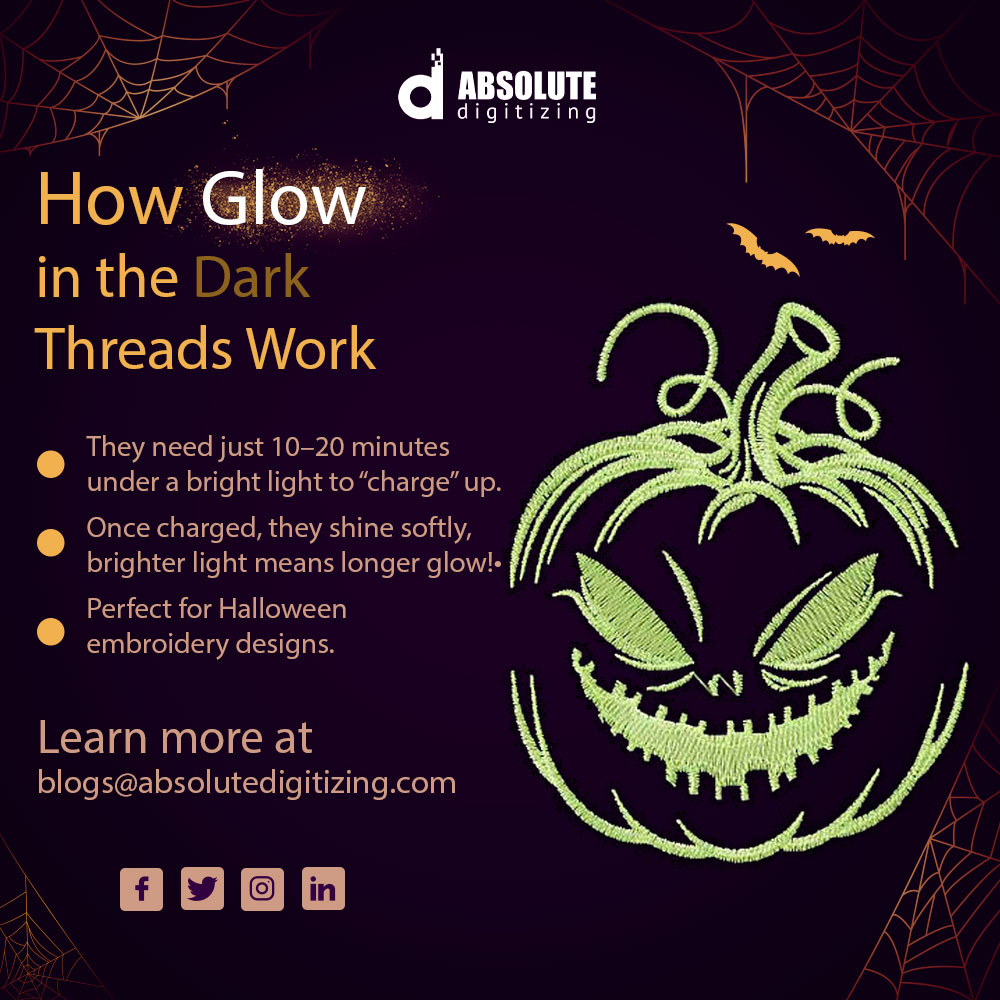
- Glow-in-the-Dark Details: Use glow-in-the-dark thread for the eyes of a jack-o’-lantern, the body of a ghost, or the moon in a silhouette scene. It’s a fun surprise that really sells the Halloween spirit.
Pro-Tips for Flawless Frightful Finishes
A great design can be ruined by poor execution. Keep these digitizing fundamentals in mind.
- Stitch Density is Key: Halloween designs often use a lot of black thread and dense fills. If your stitch density is too high, your project will feel stiff and the fabric may pucker. For fill areas, don’t be afraid to lower the density slightly. You want the design to be solid but not bulletproof.
- Stabilize for Success: The right stabilizer is non-negotiable. For towels or plush fabrics, a sturdy cut-away stabilizer will prevent distortion. For t-shirts or bags, a medium-weight tear-away should suffice. When in doubt, stabilize more than you think you need.
- Mind the Push and Pull: Dark fabrics, which are popular for Halloween, can sometimes show tiny gaps in satin stitches due to machine push and pull. Compensate for this by increasing your “Pull Compensation” setting in your digitizing software. This slightly widens the satin columns to ensure they butt up against each other perfectly.
- The Test Stitch is a Must: Never skip the test stitch! Hoop a piece of your final project fabric and run your design. This is the only way to catch issues like thread breaks, registration errors, or puckering before it ruins your masterpiece.
Conclusion: Unleash Your Inner Digitizing Witch
Halloween embroidery digitizing is a wonderfully creative playground. It challenges you to think about texture, form, and atmosphere in your stitches. From the cheerful grin of a pumpkin to the elegant horror of a spiderweb, each design tells a story.
So, fire up your digitizing software, embrace the spooky season, and start creating heirlooms that are sure to impress every ghost and goblin who sees them. With a little practice and these tips in your trick-or-treat bag, your Halloween projects will be nothing less than spellbinding.